Showing posts with label diy. Show all posts

09 March 2013

living room demolition

in my last post i showed off our dining room remodel, you may have to jog your memory since it's been nearly two months since my last post!  if you remember though, you'll remember that we decided to make what was intended to be the living room into a dining room.  so where did we decide to put our living room?  if you said the formal dining room then i like the way you think!  

the formal dining room is in the front of our home, away from the kitchen.  i knew if we put the dining room in this space it would rarely been used.  i wanted to use every inch of space in our small beloved home and this space was difficult to use.  the previous home owners admitted to us before we purchased the home that the formal dining room space was never used.  the room was a step down from the rest of the house and had arches extending across the room, which made it feel out of place and closed in.  in fact, the previous owners kept the room empty because it was such a difficult space to use.  here is a picture of roughly what the room looked like when we started tearing down .  i didn't get a picture with the ever-in-trend blue shag carpet but you get the idea.


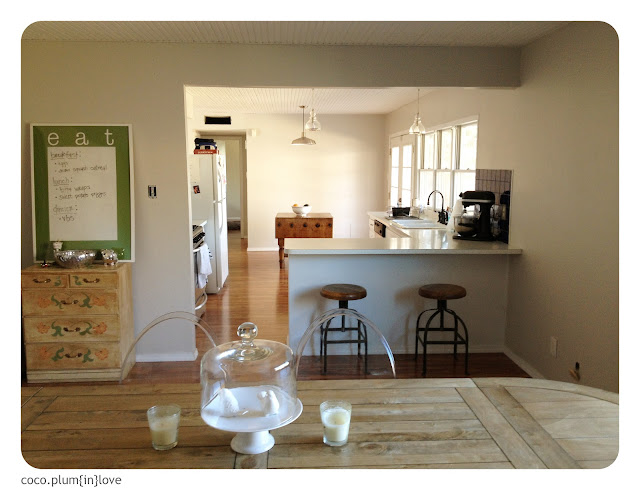
so to start we knocked out the arches and raised the floor up so the whole house would be one level.  then we painted the walls a light grey, installed bead board ceilings and put in new laminate floors.  below is a picture about half-way through the process.


and while we aren't finished, below is a picture of the progress we have made so far. 


i still love looking through the before and after pictures, it reminds me that we have done so much together and that those small things left on our to-do list don't have to be crossed off today.  instead i can sit on chester (the sofa) and enjoy what we have today.

18 January 2013

remodel reveal

as many already know we bought a home in august.   while we loved our little home from day one it was definitely a diamond-in-the-rough type of purchase.  after months of smoothing out those rough edges i am happy to reveal some of the progress.

when we first walked in the house, we knew it needed work but we saw through all the outdated bits and saw real potential.  one of the first things i wanted to change was the living room.  the living room was located right off the kitchen and had a lovely brick fireplace.  when i saw the living room  i knew it was screaming to be a dining room instead. we always seem to find ourselves wrapped around the table, deep in food and conversation and a fireplace will hopefully help us linger around the table longer.

below you can see the progression from turning a dungeon living room into a cozy dining room.


lucky for us when we ripped up the shaggy baby blue carpet this pea-green linoleum was waiting for us underneath.


amazing what a little paint can do...


in addition to paint we also covered up the outdated popcorn ceilings with white bead board.   and as you can see we still have a few finishing touches. we need new (non-rusty) vent covers, add a light above the table (which will let us move the lamp out of the corner of the room) and move the cable (can you see the cable box in the bottom left side of picture?)  into our new living room.  here are a few shots of the new space.  


just a quick recap in pictures:

before


after


people ask us what is like to remodel our home...let me tell you it's like the children's book when you give a mouse a cookie.  if you have read the book you know that when you give a mouse a cookie he then needs a glass a milk to wash down the cookie.  then he needs a mirror to make sure he isn't wearing a milk mustache. then he needs scissors to trim his little mousy mustache...and on and on it goes.  that is a metaphor for remodeling.  we were just going to do the floor.  well if we did the floors we should knock out a wall, raise up the floor a level, paint every wall, re-tile the floors, knock out a soffit light fixture, put bead board on the ceilings to cover popcorn and on and on it goes.  it's a happy labor of love though.  here is a sneak peek at the some more of our handy work.  clearly we need vent covers.


22 October 2012

industrial curtain rod diy


when i posted this picture a few days ago and told you we had a diy project up our sleeves, high class were probably the first two words that popped into your mind.  well high class or white trash but really it's such a fine line.  


rest assured we haven't lost our minds...completely...yet.  we just made a curtain rod.  we followed this easy tutorial but since our curtain rod is so long (96 inches) we added the middle brace.   we love the results and so far they have stood the test of our lives.  


we have been doing so many projects around our new casa.  i can't wait to share them.  i also can't wait to take down those awful shades on the windows too.  which was the whole point of the project and i forgot until i posted these pictures.


20 October 2012

any guesses on what project we are working on with this pvc pipe and plumbing flange?   it has nothing to do with plumbing because i wouldn't post such a patronizing question.  well i might but not today. 


27 August 2012

chip it

our house remodel is in full-swing right now.   we have our hands busy with so many project currently and somehow our to do list is growing.  one of my favorite projects is painting the interior.  as i was searching for inspiration i came across a great tool- sherwin william's chip it .  have you heard of it?  basically it allows you to take any digital image and make it into a color palette. 

 as i began to search for images i knew i wanted something nautical.  there is something about the ocean that gives me perspective and always restores me.  i want that same feeling in our new home.  when i found the image below i instantly knew this was going to be the base for the colors in our home. 


so i simply scrolled over the image and chipped it.  viola.  paint colors i could use in our home.


as i was painting samples of the colors in my home i began to realize that i wanted a more subtle feel.  the image i used for the colors was bold and bright and didn't quite capture the feeling i wanted.  in march we took a vacation to the coast and had the most amazing time.  there were two images that i snapped during the trip that i kept replaying in my mind.  both were cloudy and even stormy images and i realized that's exactly why i was drawn to them.  even though the sky was brooding and the clouds laid close to us it felt inviting.  rainy days seem to slow time and the need to rush around.  i love curling up on the couch with a blanket and watching the storm pass.  so with that feeling in mind  i decided to use chip it on the images from stormy holiday.  


so if you have a paint project ahead try chip it it's so easy and fun.  you'll start chipping images just because you can.